I celebrated the first day of fall by entering into a last minute clinic with Sue Peltier and Colleen Kelly from Millpoint Farm in Virginia. This post is both going to describe my experience in the clinic but also give you the exercises we did and why we did them, so you can use them in your own riding.
Flat Work
The 12-year old, “green” mare I rode is owned by my employer and, the clinic marked my third ride on her. Maggie (the horse) is exactly what you’d describe a PMSing mare to be like – talented, loves to jump, but hates to be wrong and hates being told what to do. The first thing we worked on was our flat work, which, up until that point had left little to be desired. Maggie is the kind of mare that falls in, bulges out, donkey-kicks to rebel against your aids, and is smart enough to figure out ways around actually working. Thus, our first step was taking away my stirrups so I could get a deeper seat and use my whole leg.
Over the years of riding alone and competing solely in the jumper ring, all of the bad habits I had years ago crept back including slight pinching with the knee, rounding of the shoulders, curling of the wrists, and poking out the elbows. As I began to correct my position, using my seat and leg instead of my hands, Maggie began to engage behind. Staying on a 20-meter circle, we did sitting trot, posting trot, changes of direction, canter transitions, walk transitions, and, as long as my heels remained down and my full leg, including my thigh and calf, stayed on, Maggie kept engaging from behind, dropping her head, and picking up her transitions when asked instead of the usual running into them and kicking out in anger.
Since the focus of the clinic was the rider and not the horse, I requested homework for Maggie and me to work on in order to create consistency with her flying lead changes and help with creating a more adjustable stride for her.
P.S. We have a lot of leg yields in our future! (Leg Yield Troubleshooting – Horse Channel)
Over Fences
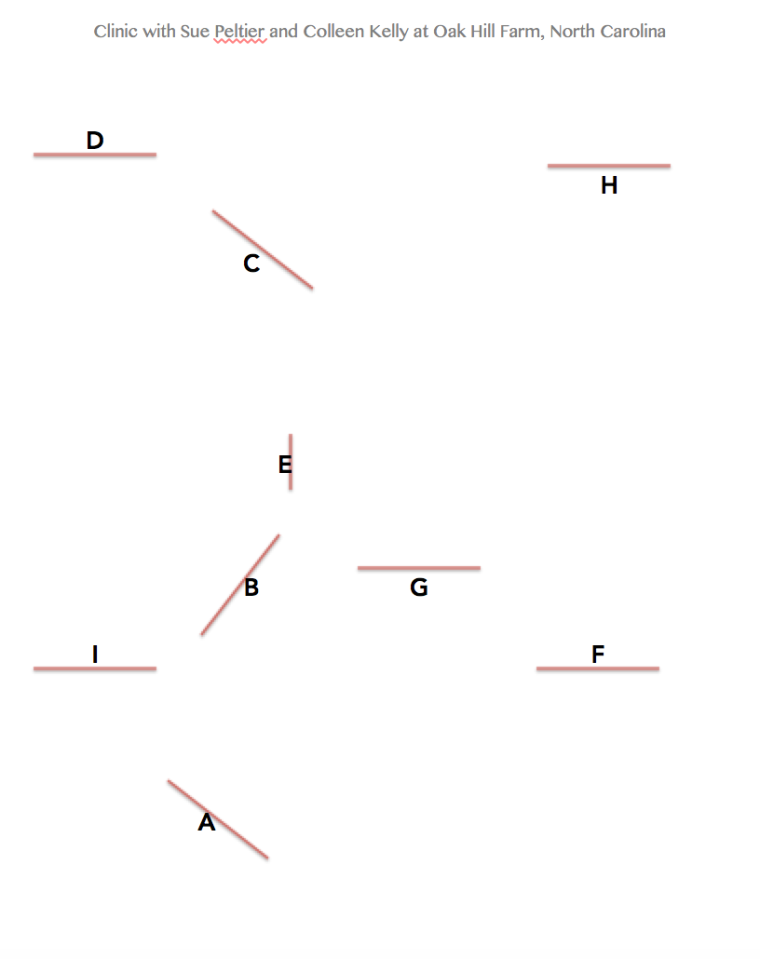
The course map below is a reference point so you can follow along as I go through the exercise and get a visual idea of how each line should be ridden.
Warm-Up: Trot Jump A (off the left)
Trot jumps are excellent to help keep your body back, leg on without rushing or driving, and work on your release over the jump. Be sure to remain out of the tack for three strides after landing to give your horse enough space to jump properly and land well without bumping their back with your bum.
* More on trot jumps and more simple exercises in case your horse isn’t quite ready for exercises as complex as the ones from this clinic. (link)
Exercise 1: Trot Jump A, Canter Jumps B & C
This exercise was first done in sections that build on each other. Starting with your trot jump remember all the things you worked on over that fence but look to your next jump, open your left rein, add your outside right leg, and keep your upper body back to wait for the quiet distance to B. Remember, you can keep your body back while remaining in a jumping position by opening up your chests, keeping your shoulder back, and waiting with your upper-body. Touch the tack a stride or two in front of the jump and remember to release.
If you get the first part of the exercise correct on the first try, continue on to jump C. At no point in this exercise should you be pulling on your horse’s mouth or using your hands to steer. If you’re a jumper rider, like me, you’ll want to make the tighter turn from B to C. However, Maggie is not a jumper and, if you recall from the flat work section, Maggie has a tendency to throw her shoulders and fall in/drift out. If you look at the course map, you’ll see that you can go all the way out to the rail after jump B and square the turn to jump C, thus giving you additional room to regroup, organize, and create a smooth ride through the exercise.
Exercise 2: Trot Jump A, Canter Jumps B, C, D, C, E, F
The first half of this exercise is the same as the first so, by the time you move onto the second half, be sure you’ve really worked through Exercise 1.
Now, after you land from jump C, push your horse out and around your leg to use all the space you have in the ring. You want the organized, quiet distance to jump D and when you land you want to push all the way out to the rail and use all the space you have. Looking at the course map, you can go all the way down and turn in front of jump I in order to make a smooth, collected rollback to jump C.
Again, canter away from C, push out and use the whole ring. Be careful not to pick up too much speed because jump E is a skinny. Find a rhythm in your canter and stay with it. Wait with your body to jump E, and look to jump F. This is a tight and awkward turn. Your horse is probably going to think that you’re going around jump F instead of over it so keep your left leg on and wait with your body. There’s no need to rush anywhere in this exercise.
Exercise 3: Canter Jumps D, C, E, F, Trot Jump A, Canter Jumps G, H
All of these exercises are making sure that you’re using all your aids, but predominantly your legs, to steer and direct your horse around a course. The first half of this exercise you’ve already done starting with your rollback to your skinny and the awkward turn to the in of the outside line. Now, after you land from F, you’re going to trot before you get to the end of the ring, use your legs to shape your turn, wait with your body, and have a nice quiet trot jump over A. Open your outside right rein and add your inside left leg to push your horse over to meet jump G. Note that if your horse doesn’t have auto changes, you may land on the wrong lead and end up counter cantering jump G in which case you need to balance yourself and really keep your upper body back. Again, this is a very awkward broken line that you’re riding so again, in order to get to jump H, you’ll need to push over with your inside aids and open your outside rein to give your horse the space to move out and meet jump H straight and centered.
Exercise 4: Canter Jumps B, G, C, B
This last exercise was just for me and Maggie. Turns out, we were better at the tight turns than we were with long approach, single fences. For this part, I worked on keeping my body back and forcing Maggie to wait for the quiet distance but also being sure to give her a big release and canter away so she could jump clear. We continued to jump this pattern, adding in other, long-approach, single jumps depending on what we could get to until our jumps became consistently smooth and I began to consistently wait with my body for the tighter distance instead of asking her to jump the distances I saw.
If you have any questions, comments, or want me to go into more detail please let me know! This clinic was a big help for me, especially after 3 years of no formal training whatsoever. My only regret is that I didn’t film it so I could see how we were jumping – you can always see more of what’s going on from the “ground”!


