Stay Riding Ready In Corona-Quarantine

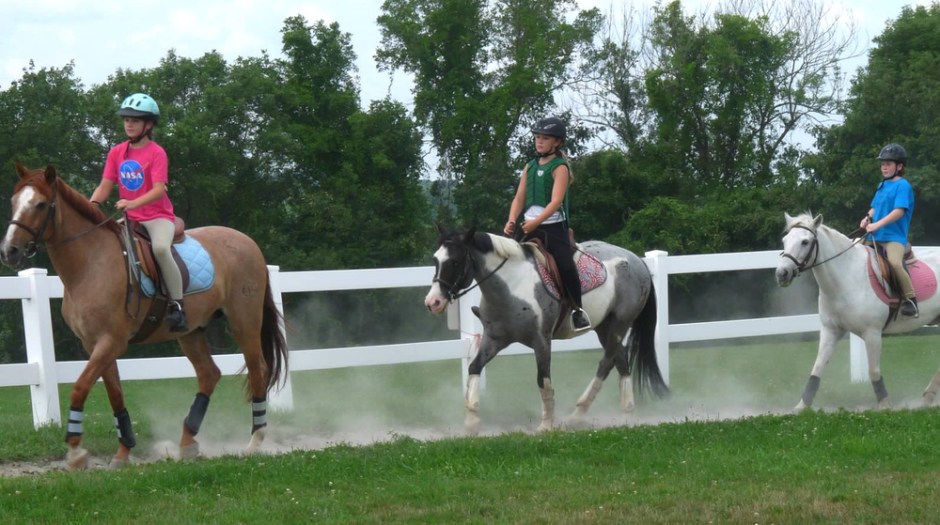
I’m thankful to be writing this after enjoying an afternoon trail ride with my mare, Honey. Typically, she won’t go out alone, but we are following social distancing recommendations and decided to give it a try. Much to my surprise, she seemed to enjoy herself and never motioned to turn around or cut our trail short!

I know many people aren’t as lucky, and some barns have been forced to close due to the COVID-19 pandemic. That said, there’s a lot we can do as equestrians to keep our bodies prepped for when we can get back in the saddle again.

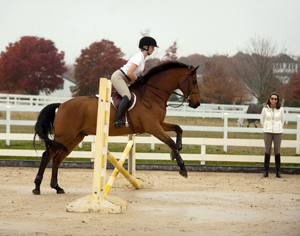
Before we get started, I want to review all the muscle groups engaged while riding:

Muscular System

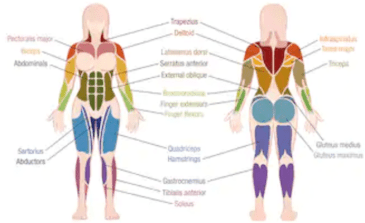
  • Hip Flexors, Abductors, and Adductors
  • Groin Muscles
  • Glutes
  • Quadriceps
  • Calf Muscles
  • Shoulder Blades
  • Back Muscles
  • Abdominals

Noelle Floyd does a really nice job discussing how we use each of these muscle groups while riding, but for today’s purposes, I want to simply bring awareness to how much our body works while we’re in the saddle.

My biggest recommendations for riders at home are to:

  1. Stretch daily.
  2. Keep working your riding muscles.
  3. Create a plan with your trainer for when you return.

Stretch Daily

As a lifelong rider, my body talks to me – a lot. My hips are tight, my low back is in [almost] constant pain, and my hamstrings always need time to loosen up. I’ve learned to never underestimate the importance of stretching when it comes to skeletal alignment, posture, balance, and overall comfort. That said, I love this video from Blogilates that walks you through a great daily stretch routine to help relieve stress and increase flexibility in your hips and legs.

If you’re tight and looking for a full-body stretch, this is another video that you may want to cycle into your stretching routine.

Work Your Riding Muscles At Home

You may be worried that all the hard work you put in to prepare for this summer show season is now being wasted in quarantine. Try to push those thoughts out of your mind and focus on what you CAN do.

I am a member of Barre3, and I absolutely LOVE it. It’s a great, low impact way to work and tone my riding muscles. However, if subscribing to a new service isn’t what you’re looking for, there are plenty of exercises we can do at home to stay fit for riding.

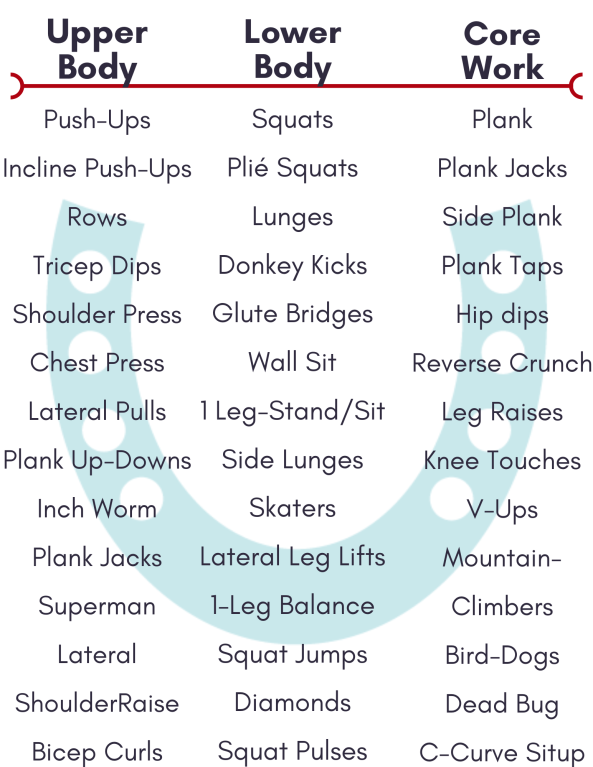
In all of my workouts, I incorporate some variation of the following:

  1. Warm-up (get your heart rate up)
  2. Circuit 1 (3 exercises, 3 times through)
  3. Circuit 2 (3 exercises, 3 times through)
  4. Core Work
  5. Cool Down & Stretch

When you’re creating your circuits, make sure you include a variety of upper and lower body exercises. Aim to do 8-12 repetitions of each exercise, three times per circuit.

Upper Body

I also recommend finding other types of workouts to keep exercise interesting. Livestream classes are popping up all over Instagram and Facebook feeds as local fitness studios try to keep their customers engaged – take advantage of those!

Barre3FarmingtonValley has live classes throughout the week.

Bandier, a fitness brand, offers live classes every day at 4:00 pm featuring different kinds of workouts led by fitness professionals.

Barry’s Bootcamp also provides interval and cardio workouts that have become popular in many of our major cities.

Yoga from the Heart has a variety of live yoga classes each day. In general, yoga is another great way to combine strength work with stretching and core stability.

Make a Plan with your Trainer

This last one is to help both you and your horse when you can finally get back into a regular training routine. Depending on your quarantine restrictions, you may need to modify your show schedule for the summer and determine what your horse will need to get competition ready.

Some questions you can ask your trainer are:

  • How many rides should I do per week once the barn reopens?
  • How frequently will my horse and I be able to lesson?
  • Will my horse need any training rides?
  • When is it feasible to start showing again?

Remember, there are many unknowns about how long this pandemic will last and whether or not competitions will even take place this summer. Understand that your horse may lose some muscle if your barn is forced to close, and you will need to be patient with both your horse and yourself as you work your way back as a team.

Everyone’s circumstances will be different, but together we can support one another and make it through this just fine.

Advertisement

“You Can’t Make Everyone Happy” – No Longer Applies

Lesson-banner-2

After a few weeks of teaching riding lessons, I’ve come to truly realize and understand what my trainers went through every day. It’s a constant balancing act between loving your students, wanting them to truly excel, and keeping in mind how far they actually want to progress compared to how much fun they want to have. Continue reading ““You Can’t Make Everyone Happy” – No Longer Applies”

Trail Riding

My mare has done a lot in her lifetime; mini prix showjumping, dressage, foaling, and now back in the showjumping ring.

While it’s important to keep show horses in a regular workout routine, it’s also important to get them relaxed and out of the ring. Your horse should love their job and you don’t want their sourness to the ring getting in the way of that.

Especially after a hard ride, I love to take Honey out of the ring to stretch her muscles, relax, and get used to being ridden outside the confines of an arena. Plus, it’s a great way to continue to build your relationship with your horse…after all, a horse and rider’s success is based on mutual trust as a team.

Still worried? Think of it this way: if your horse doesn’t get used to being ridden outside of the ring, you can’t blame him/her if they act up while riding them on a show ground.

Always trail ride with a buddy, or at least a cell phone, and always be sure to stay alert and aware of your surroundings. Safety first!

Cheers!

Jump Into Spring

jump

If you’re anything like me then you love to jump. . .and so does your horse. The problem is, when you don’t have a covered arena, the winter season can get you out of shape and out of practice. Not only does your horse need to regain lost strength and stamina but so do you! Not to mention, as the rider you are the “driver”. This is my slow and steady workout to get my mare, Honey, back in show jumping shape.

Week 1: Do It Without the Jumps

At the start of any conditioning series you really want to get a good feel for where you and your horse are as a team. The first few rides of week one I use to feel my mare out with flatwork. It’s important to have your horse listening to your aid, moving off your leg, balanced, and adjustable on the flat before you think about adding obstacles into the mix. If you have all of these flatwork elements, “checked off”, then you’re good to go with week one! My rides always start with about 10-15 minutes of flatwork focusing on transition as well as lengthening and shortening. Transitions, especially when done correctly ensuring your horse is using their hind ends and not falling forward, are excellent practices to building muscle and increasing responsiveness. After raised trot poles you’ve warmed up with some flatwork, add some trot poles into your workout. These are great for getting your horse to really use their muscles to pick up their feet. If you’re more advanced, raise the trot poles for an added challenge for your horse. Just be careful, I have a hot horse and we have to walk through raised trot poles before attempting to trot them because she thinks that she’s supposed to jump them. Always be listening to your horse and supporting them.

A Guide For Trot Poles - I use one big step
A Guide For Trot Poles – I use one big step

Now, the trot poles are for the horse but the canter poles are for you. Canter poles are great because they’ll help you regain your eye for distances once you start jumping but they’re easy on your horse’s legs. The exercise below will help with your eye but more so help with your seat, your position, and how much you’re supporting and helping to balance your horse. If you’re just working on you eye, I suggest single canter poles or canter pole lines, etc.

Do this at the canter: Your goal is to have the same number of strides between every pole (This is very challenging when done properly)

Week 2: Hot to Trot

Keep the fences low, either small x-rails or low verticals and keep it simple with single fences. You should still start your workout with good flatwork exercises focusing on elements of balance and adjustment that you feel is needed for you and your horse to improve. I know, I know, we all hate trot jumps but they’re actually super helpful for two reasons:TrottingFence

  1. They’re great for building muscle in your horse’s hind end because they force your horse to rock back and use their haunches to jump. Remember not to let them rush the trot jumps so this can happen!
  2. They force us, the rider, to really keep our upper body back and let the horse jump up to us instead of us jumping ahead of the horse.

Week 3: Exercises

This is the time to think about all the courses you’ve jumped in the past and dissect them element by element. Keep the fences at a low height (but slightly higher than your trot jumps) and practice the course elements you set up. For me, I make sure to set up long straight lines, rollbacks, long approaches to single fences, skinnies on the short end of the arena, bending or broken lines, and even some fences set up on a serpentine. While you can’t do all of these at once you can do at least half of them and only have to set up four (4) jumps in the ring so don’t get overwhelmed. Remember, the idea here is to keep the fences low and work on the technique and execution of riding each element individually. We’re NOT putting them into a full course just yet but rather practicing so that when we do, both rider and horse are confident and ready to ride.

222-web
One example of an exercise that will work on bending lines in both directions depending on what route you take.

*Note: I never jump every day of the week. Even when practicing exercises over low fences, I’ll only do three (3) days a week of jump work with one (1) day off and three (3) days of complementary flat work.

Week 4: Set the Course

Now it’s time to put all the exercises we worked on in week three into a full course. My suggestion for you is to have the jumps set so you can ride a more simple, hunter-like, course for your first course and if all goes well, add some equitation-like elements to make it more challenging. It depends on your horse, so be sure to be listening to them, but I usually raise the jumps to a low schooling height for our full course with some trot jumps as my warm-up. For example, my mare and I show at 3’6″-3’9″ so our height for this week in our training will be 3′-3″ if she feels good over the 3′-fences. I always jump a few single fences at this height before asking her to do a full course to get a feel for how she’s jumping. Also make note of your horse’s breathing and give them plenty of breaks to stretch out and walk if they’re sounding like a freight train. Pushing them is good to an extent but I always ere on the side of caution if my mare is telling me she’s had enough.

After week four I play it by ear but if you’re curious, this is what my horse’s weekly workout schedule looks like:

See you at the show!

Monday: Rest

Tuesday: No Stirrups Flatwork

Wednesday: Trot Jumps

Thursday: Flatwork

Friday: Low/Medium Exercises

Saturday: Full Course/Trail Ride

Sunday: Light Flatwork/Trail Ride

Leave the Seesaw on the Playground

574955_436516789758079_1579563209_n

I recently was lucky enough to make my way down to the Winter Equestrian Festival in Wellington, FL and watch the jumper derby that was being held two weeks ago.

Now, I’m not calling myself an expert but there are a few things that just make sense:

  1. A horse cannot be looking at the ground if it is expected to jump a 5′ fence
  2. In Man vs. Horse tug-of-war, the horse wins…every time

While many riders had wonderful rounds it amazed me that at this level of competition, these mistakes were being made. There have only been two times in my life where I have wished that the horse would throw its rider and get the heck out of there.

First, was when a “trainer” (no clue who) couldn’t handle a horse she was showing and decided to jump a 3′ course in draw-reins. Second, was at this jumper derby when the rider literally pulled the horse’s teeth out and then spurred it over the fences. The first time, the trainer did get thrown and the horse did get the heck out of the ring before politely waiting by the schooling area for someone to catch him. This jumper was forgiving (I guess) and instead of throwing his rider, he simply refused to jump.

I find it so helpful to watch people ride at upper-levels because every mistake made is amplified and by watching others, you can better analyze and improve your own riding. How does that quote go?

If you do not learn from history, you’re bound to repeat it.

Well, learn from the riding mistakes of others so you don’t find yourself approaching a 4’9″ fence and feel your horse slide to a halt because your constant seesawing on his/her face is not helping anyone. I know I’ve kept that thought in the back of my mind for every course I’ve ridden & the times a compromise with my mare are the times we go double clear.

Equine Ballerina

I started riding Western & barrel racing out in Colorado when I was still in the single-digits [in terms of my age]. Since my family lived in Connecticut, I soon started riding English and by middle school I was showing in the hunter/equitation ring. About halfway through high school, I got burnt out between the politics and the money involved in equitation so I flat out quit riding. I had to sell my horse in order to pay for college anyways so I figured, what the heck…no horse, no money for the show, and, if I quit, no more politics or stress.

So what did I do with my time?

I went back to dance class and picked up ballet..yes..ballet. I promise, there was no tutu involved but nevertheless…I was a ballerina for my senior year of high school. At about that same time, there was a 27-year-old riding trainer at my school/barn (they were one in the same), who saw the real me better than I could at the time. She convinced me to start riding again; training with her and her students for IEA (Interscholastic Equestrian Association) horse shows. Stay tuned for another post on IEA but, for the sake of this story, I’ll summarize by saying that IEA shows are horse shows for students in middle and high school to compete in one of four divisions. At these shows, you leave your own horses at home and instead, you ride one of the hosting farm’s horses that is selected by pulling a [horse’s] name out of a hat.

Anyways, I started riding and showing again solely to fill the “Open” division for our IEA Team. Though I had always placed well at shows, this became the first time that I was consistently placing in the top three at every show. Fast forward  to the Spring of my senior year of high school and I ended up winning the 2010 IEA National Finals for my division.

So what does this have to do with ballet?

Answer: Everything!

EWS IEA 2010

In equitation, position is over 50% of the deal. Next to modeling, equitation may be one of the most judgmental competition forms that exists. However, ballet can improve your position (and your scores) more than you could ever imagine (at least it was a surprise for me). While I strongly suggest taking a Barre class or two (it’s seriously a great workout & will improve your position just like ballet class), I will give you the key tips that will really help (though a formal instructor is probably better).

Tip 1: Engage your core!

How?

Stand with your back against the wall. Engage your core and tilt your pelvis forward so there is no room between your back and the wall (thus removing the arch in your back). Now, remember how this feels and try to do it without the wall as your guide.

Tip 2: Keep your shoulders back AND down.

How?

You can practice this against the wall as well for a guide but be sure check yourself every now and then by rolling your shoulders up, back, and then down. Don’t forget to keep engaging your core!

Posture

Final Step?

Do this on your horse.

It will take time to build the muscle memory but I PROMISE you, it will be worth it and help your position and connection with your horse on both the flat and over fences.

Questions? Please post them!!!!

Can’t wait to hear from you!

Flatwork Matters [Even When You Jump]

Every time I tell people I’m a jumper, especially when I talk to people who mainly focus on the dressage, I can see their expression change to a smirk & it’s almost as if they’re thinking, “yeah she can jump but she probably let her flat work go in order to get there”.

Unfortunately, at one point in time that assumption would have been correct. It took my years to realize just how important your flatwork can be when you’re jumping. If I could sit with you and watch all the grand prix riders go through their courses I would love it! Since I can’t, let’s imagine for a moment that we’re at WEF in Wellington, FL & we’re watching all the top show jumpers from around the world.

Watch their approach to the fences; their positions; their seat & their aids.

It’s even better during the jump-off rounds. You can see the adjustments more clearly since they’re trying to both go clear and jump the fastest time.

Your flat work matters because your flatwork could be the reason you knock the rail, your horse stops, you get a bad distance, or you miss the jump completely. You and your horse are a team when you ride, whether you’re jumping or flatting your horse should be listening to your aids and you should be listening to your horse. If you do your flatwork properly, then you’ll be able to respond to any changes that may occur in your course.

I remember I was riding a 5-year old on his first trip down to Palm Beach, FL for WEF & he spooked at everything! It made it that much more important that I used my seat & did my flat work in the corners not only to set him up for the next fence but to also bring his attention back to me so that he was listening to me and not the spectators, announcers, food stand owners, or other exhibitors.

The horse I have now requires flat work in order to bring her back after every fence. She’s a hot horse & a jumper meaning I don’t have the luxury of wide turns to re-group and focus on flat work so I have to be direct & clear with her in a short period of time without becoming too reliant on one aid or another. Here’s where “flatwork” as a whole comes in. I can’t just pull a horse’s teeth out or spur her to make her listen to me…I have to work with her, as a teammate, and communicate using all my aids. With proper flatwork training at home, it’s a lot easier for me to make corrections quickly AND properly in order to ensure a clean and quick show jumping round.

Need some flatwork exercises?

  1. True-bend & Counter-bend: try changing the bend every 8-10 trot steps and make sure that you’re not only changing the bend of their neck but rather you’re changing their entire bend using all your aids (leg, seat, & then hands last).
  2. Transitions: I know it may sound simple but the more transitions you do, the better. Not only will it build muscle for your horse but it will also improve responsiveness between horse and rider. Try doing transitions between gaits as well as transitions within gaits. To really challenge yourself, you can set two ground-poles 7 (this number is up to you) canter strides apart. Go through the poles in 7 strides, then lengthen the stride the next time through to get 6 strides, then lengthen more to get 5 strides, then go back to 7 strides, then shorten the next time through the poles to get 8 strides, then shorten even more the next time to try and get 9 strides. Remember, the key here is not to ride like a bat out of hell for fewer strides or ride like you’re going to pull your horse’s teeth out to fit the additional strides, rather ride from your seat and leg for both with your hands as an additional aid. Your body can do wonders in terms of communicating with your horse so try and open that line of communication.
  3. Spiral Circles: You can do these at the walk, trot, and canter if you want depending on your level of experience. Start on a 20-meter circle and as you keep going around the circle you continue to make it incrementally smaller. Make sure the inward movement is coming from your leg asking your horse to move its whole body in, like you would if you were asking for a leg-yield. You’ll feel what movement is right for your horse. As the circle becomes smaller and smaller it will be harder and harder for your horse to continue the forward movement and will require immense support from your seat and leg as well as immense work from your horse’s hind end (you’re essentially asking for haunches-in). When you’re ready, use your inside aids to push your horse outwards to incrementally widen the circle (now essentially asking for haunches-out). Then switch directions and do it again after giving your horse the chance to trot on a loose rein and stretch their neck and back out.
  4. Counter Canter: This won’t be easy for many horses but it’s an excellent exercise for both horse and rider. Start with trying to counter-canter (hold the canter intentionally on the wrong lead) all the way around the ring. If you’re already there, here’s an exercise that will be helpful if you’re showing in upper-level equitation or if you’re just looking for a challenge. Pick up your counter-canter up the long-side of the arena. Hold it around the short end through both the corners. Continue you’re counter-counter half-way down the opposite long-side then push your horse onto the quarter-line before turning them in towards the rail to change direction (while holding the same lead) to end up on the proper lead & halt in the corner.

So, You Want to Own & Operate a Farm?

As you’re growing up and trying to figure out what you’re going to do for your professional life people always tell you, “do what you love”, or, “find something you’re passionate about and make that your job”. Naturally, any horse person will think, “AHA! I love horses so I should own and operate my own farm one day”!

Please, if this is you, PAUSE, think, & understand that this means you want to start your own BUSINESS.

Yes, a horse farm is a business and horseback riding is an industry.

NL-Phillips-John

So many times I see passionate people who love horses start their own farm and then get burnt out, go broke, or get stuck with a farm that’s falling apart and a far cry from what they originally wanted and dreamed about. That said, here are a few things to consider in order to make your farm a revenue positive business!

Quality lesson horses for a variety of levels 

Trinket

Lessons are the foundation to how you are going to make money and the lesson horses you have will either make it or break it. You want to attract junior riders who will inevitably bring their parents along to all their lessons. Yes, you need to fall off and get back on if you’re really going to learn how to ride but, wait until the rider is confident in the saddle before putting them on a dirty stopper or easy spooker. Set the parents at ease by having safe and reliable lesson horses for their kids to learn on. Now, here’s the important part. Lessons are only the entry point for your main revenue builder; shows. Have lesson horses that you can take to local horse shows in order to get the kids, and the parents, excited about competition. You want to make sure your kids are placing in the top four ribbons for their first few horse shows in order to get them hooked on showing. There are a few that will love it no matter how they place…but the truth is, it’s a lot easier to love showing if you actually do well every now and then. Eventually, they’ll want to show more and outgrow your lesson horse which is when you start looking to find them a show horse.

Sell or lease out your personal horses (if you have more than one)

Your lesson horses are now “your horses”. If you have one for yourself then fine but just because your horses are on your property doesn’t mean they’re free. Having a herd of your own horses that aren’t or can’t be used for lessons will drain your business.

Have a trainer!

Lesson

In order to show you need a trainer. More importantly, in order for kids to learn how to ride and be comfortable they need a consistent teacher who they’re used to riding with. This might mean that you have two trainers, which many farms do…one for beginners and one for the upper level or actively showing students. Another fun option is to have an IEA (Interscholastic Equestrian Association) team. This is great for kids who can’t afford their own horse but still want to show. Plus, it gets your farm name out there and can really build a strong foundation for your riders (look for my upcoming post with more detail on IEA!).

Purchase a trailer or two 

ShowGirls

Showing is a must unless you plan to be a breeding or rescue farm. Sometimes you’ll have one or two horses going to shows, other times you’ll have four horses going to shows. Competition is a great way to build relationships between your students and create a “barn family” or a greater community feel to your farm which is AWESOME for your barn! Having both a two-horse and a four-horse trailer gives you flexibility and allows your trainer to show in order to keep their name out there and possible get your horses name’s out there.

Safe Fencing 

It’s safe to say that you’re going to end up with some show horses on your property and, as a member of the hunter/jumper/equitation show world let’s face it…show horses are prissy! Safe fencing is going to be one of the first things that new boarders look at when deciding whether or not to bring their horses to your farm. If you have to, get a bank loan or small investment through crowdfunding or other sources but it’s better to be safe about fencing then skimp on it at first and have to deal with it later.

Good Footing

Discipline doesn’t matter when it comes to footing. Make sure that your footing is going to be good for the horses and, for your outdoor ring, make sure that it’s put in properly so that rain, snow, and other kinds of weather don’t upset or unsettle the footing so much that it damages the ring. Indoor rings are a HUGE plus especially if weather makes it difficult to ride in the winter but, if that’s not in the budget, leave space for the possibility but maybe have a covered round pen or something so that boarders can still ride regardless of rain or snow.

Be online! 

People Google..and they will google you. So much is online now that if you’re not, it affects how people view your credibility. Even a basic website and some social media pages can go a long way! This is where a lot of farms drop the ball and having an online presence really does help you build your business, credibility, name recognition, and even show recognition. Have a blog so people can get a better feel for your trainer’s style, your farm’s identity, and who you are as a farm owner. If it’s ok with your riders (or their parents if they are minors) then post photos, videos, and articles about them and their achievements. There’s so much you can do that can help ensure your future success!


If you have any questions or are interested in talking further about building your barn’s brand, let me know!

Comment or email me at: elizabethfgreenberg@gmail.com

There’s A Monster Under That Jump!

We’ve all been here, right?

Abbi versus Tarp
Abbi VS. Tarp

If you notice where the top rail is as opposed to where her knees are, you’ll understand a common equine fear of: The Monster Hiding Beneath the Jump.

This horse is older but has only been jumping for about 4 months so it’s nothing out of the ordinary but so many times I’ve notices that people mark these horses as “naughty” or “dirty stoppers” without ever even giving them a fighting chance. Sure, Abbi and I don’t always see eye to eye and she does run out and stop at fences but not because she’s a bad horse. . .it’s because she doesn’t have the confidence in herself and she needs to gain that confidence from me.

So naturally you’d think. . .strong rider will fix the problem. Wrong. This horse needs a strong and confident rider when jumping but she also needs to trust her rider and that trust is earned.

Since we didn’t die our first jump over the horrible awful tarp…we began to build trust & with a strong, direct ride to the tarp jump again, we painted a prettier picture:

Abbi VS Tarp: Round 2

Now, we are still afraid of the tarp. . .but she’s also listening to me more and jumping across as well as up & over the fence.

Unfortunately, our camera-woman only took these two photos but as Abbi continued to jump, her trust in me grew and with my confidence in our abilities as a team, we were able to create some really lovely fences.

Abbi Jump

So keep in mind it’s both confidence and trust on both the rider and the horse’s part in order to make a winning team. Especially for young horses or older horses learning new tricks. . .consistency in this is key. She is jumping bravely and beautifully here but if her rider (me or someone else) were to misguide her, lose our confidence, lose our commitment to the jump, and/or work as separate parts instead of a team then Abbi’s trust will be lost and we will have to start at the beginning again.

Riding a new or young horse is like a new relationship. If you’re young then it’s building trust and learning how to work as a team. If you’re re-training a horse who’s been through it already then you not only have to build trust but you have to convince that horse to trust you even after they’ve been let down by someone else.

So the key takeaways for working with horses like Abbi:

  1. Confidence & Commitment
  2. Trust (it goes both ways)
  3. Consistency

Hope this is useful for you! If you have any questions or comments please don’t hesitate to ask!